2 minute Photoshop trick – Paste Into

Photoshop is an incredibly powerful application but it can take a long time to master its many features. I have produced a number of short videos to help my students get to grips with some of the commonly used tools and controls. This short training video shows how the Paste Into function in Photoshop can be used to replace a selected area in a photograph with content taken from another picture.

More of my training videos can be found at www.nigelgoldsmithmedia.wordpress.com or if you would like to discuss bespoke Photoshop or photographic training send me an email to mail@nigelgoldsmith.co.uk


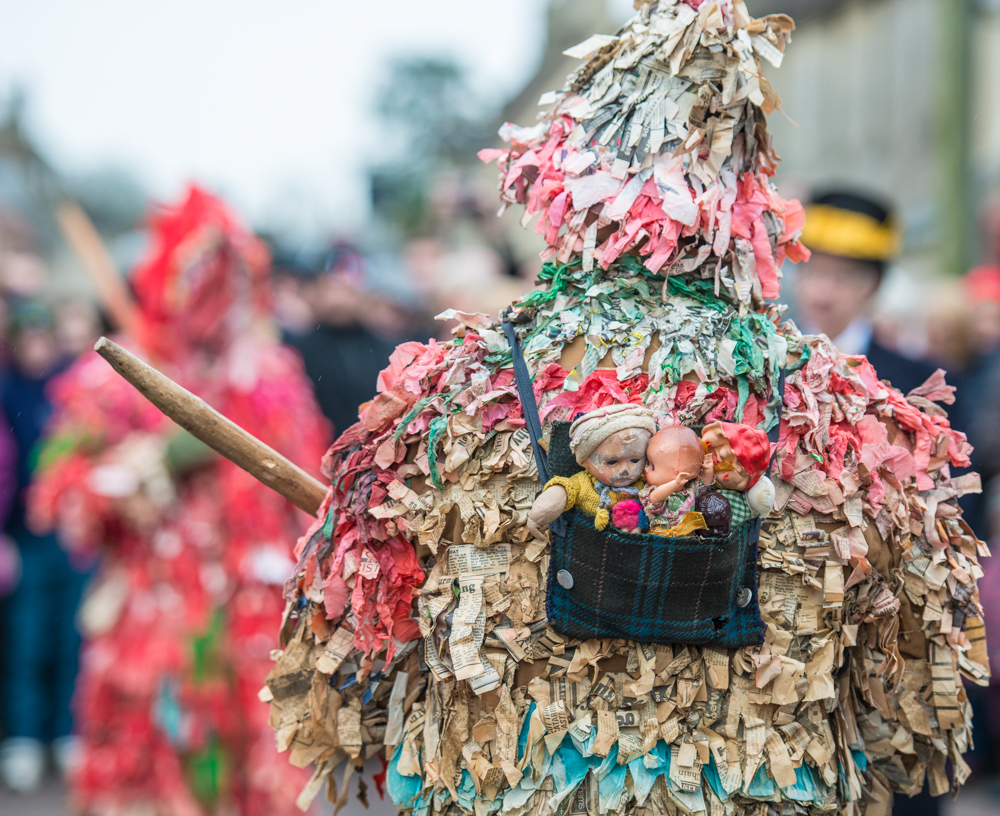
‘Saucy Jack’

The Marshfield Mummers continue an ancient tradition every year at 11am on Boxing Day. A short, three minute play is performed a number of times along the length of the High Street in Marshfield near Bath. The play has changed little over the centuries, it is only performed on Boxing Day with a single rehearsal earlier in the morning.

The image below is of ‘Saucy Jack’ who carries his family on his back. Other characters include King William, Tenpenny Nit, Beelzebub and Dr Fennix.

There are more images in this earlier post 

'Saucy Jack'  a character from the Marshfield Mummers Christmas play

‘Saucy Jack’ with his family on his back

The photo film – an alternative to web video

The value of web video

There is considerable research proving that online video can enhance the user experience and boost Google rankings but for many organisations the cost is way beyond their budget.

Online video should be of a high technical standard to retain the audience. A video crew typically has three or more skilled people to capture the image, record the sound, light the set, direct the process and put it all together in the editing suite. In contrast, a photo-film can be produced by one person.

still images for photo film

What is a photo-film?

A photo film is a set of still images, carefully ordered into a series to create a slide show. A voiceover or soundtrack is combined with the images to produce an audio slide show. This is then published on familiar sits such as Vimeo or YouTube from where it can be embedded on websites, blogs or social media.

Like video the production is carefully planned, a script is written and a storyboarded is agreed. At a convenient time the images are taken or historic images might be digitised. A three minute photo-film can use between 50 and 100 images. The voiceover and ambient sound may be recorded during the visit or alternatively a voiceover artist can be hired. The media is then combined on standard video editing software and a ‘video’ is born.


Advantages of a photo-film

  • It is cheaper to produce than normal web video.
  • Involves a smaller crew which is less disruptive for the client.
  • As the sound is recorded separately it can be captured in a recording booth. This greatly improves the sound of the audio.
  • The images used to create the photo-film can also be supplied for other applications such as print or online publication.

Photo-film examples


Do get in touch if you would like to know more about photo-films or web video on mail@nigelgoldsmith.co.uk

How a photo film was used to showcase a unique property near Bristol

While still images are well suited to providing would-be-housebuyers with a visual guide to what a potential property has to offer, most estate agents are limited to using a handful of images to describe a house.
A well produced photo film provides a richer experience for the viewer. A typical 3 minute photo film can use between 60 and 100 images and have a professional quality voiceover and background music track. A by-product of the photo film is a set of high quality still images which can be used for both standard print or screen useStill image taken from photo-film

The current owners of The Chapel near Bristol wanted a photo-film to showase their property. The film combines stills, video and music (piano) and voiceover recordings, all captured in the property.

Audio quality is as important as image quality so we use professional studio microphones and can set up a temporary recording booth to maximise the clarity of the recording. Alternatively we can use a professional voiceover artist to read an agreed script.

Still image taken from photo-film

Once edited, the client is provided with a web-ready high definition photo-film in a common video format and a full set of images which can be used on screen or print.

Stop motion animation – bringing characters to life in the blink of an eye

If you are creating a stop motion animation with ‘off the shelf’ characters it can be quite difficult to give personality and expression to your ‘talent’. While it is possible to tweak a mouth here or eyebrow there with applications such as Photoshop, it is very time consuming and involves making major changes to the appearance of the product you may be promoting. A very simple way to give some personality to your characters is to get them to blink or wink. A simple blink may be a character’s response to another character or an event but it does make it look like the character is awake and reacting to its environment. This also doesn’t significantly change the appearance of the character.

I normally place all of the frames in order onto the timeline in Adobe Premiere and do most of the editing. When we are happy with the rough edit I clean up the shots in one by one. Global edits such as dust removal will all ready have been done in Adobe Lightroom when I first import the images so this stage doesn’t need to be too labour intensive.  Premiere lets you transfer still frames from your timeline into Photoshop. These frames can then be edited.  When saved the edited version replaces the original frame in the timeline.

Stop motion animation Edit in Photoshop

Edit in Photoshop

I normally use between 3 and 6 frames for a blink in stop motion animation. This varies with the frame rate of the video I am creating. For 10 FPS I use around 3 frames, for 25 FPS I use 6.

individual frames making up a blink

individual frames making up a blink

I use the Clone Stamp, the Heal Brush is a bit too perfect and can blend in the skin or fur so well that it removes any trace of an eye. The Clone Stamp leaves is a bit more patchy, this can look like there is an eyeball beneath the cloned eyelid. I also leave a bit of the eye at the bottom of the ‘socket’ in the frame for the fully closed eye (above image on right). This looks like eye lashes. I normally have a couple of frames to allow the eye to re-open.

Obviously a cheeky wink is done in the same way.

The above clip is from a recent stop-motion showreel

LinkedIn
Instagram