Stop motion animation – bringing characters to life in the blink of an eye

If you are creating a stop motion animation with ‘off the shelf’ characters it can be quite difficult to give personality and expression to your ‘talent’. While it is possible to tweak a mouth here or eyebrow there with applications such as Photoshop, it is very time consuming and involves making major changes to the appearance of the product you may be promoting. A very simple way to give some personality to your characters is to get them to blink or wink. A simple blink may be a character’s response to another character or an event but it does make it look like the character is awake and reacting to its environment. This also doesn’t significantly change the appearance of the character.

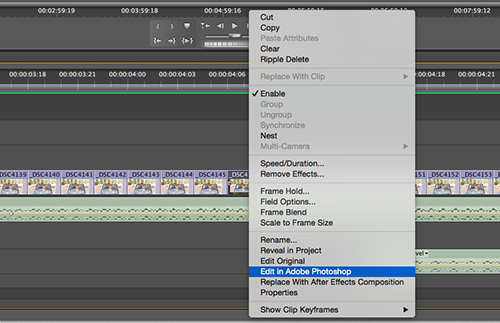
I normally place all of the frames in order onto the timeline in Adobe Premiere and do most of the editing. When we are happy with the rough edit I clean up the shots in one by one. Global edits such as dust removal will all ready have been done in Adobe Lightroom when I first import the images so this stage doesn’t need to be too labour intensive.  Premiere lets you transfer still frames from your timeline into Photoshop. These frames can then be edited.  When saved the edited version replaces the original frame in the timeline.

Stop motion animation Edit in Photoshop

Edit in Photoshop

I normally use between 3 and 6 frames for a blink in stop motion animation. This varies with the frame rate of the video I am creating. For 10 FPS I use around 3 frames, for 25 FPS I use 6.

individual frames making up a blink

individual frames making up a blink

I use the Clone Stamp, the Heal Brush is a bit too perfect and can blend in the skin or fur so well that it removes any trace of an eye. The Clone Stamp leaves is a bit more patchy, this can look like there is an eyeball beneath the cloned eyelid. I also leave a bit of the eye at the bottom of the ‘socket’ in the frame for the fully closed eye (above image on right). This looks like eye lashes. I normally have a couple of frames to allow the eye to re-open.

Obviously a cheeky wink is done in the same way.

The above clip is from a recent stop-motion showreel

Traditional black and white darkroom workshops and consultancy service – onsite

Many photographers feel that while their digital cameras produce amazing quality images when used correctly but believe the craft of the media has been taken from them and embedded in software applications. The darkroom is still a place where the true craft of photography can be found. Darkroom equipment which was once priced beyond the means of the typical enthusiast photographer can be picked up in online auctions for a tiny fraction of its original value. Sadly, courses on the subject are slowly disappearing as colleges convert their darkrooms into digital editing suites.

The day was jam packed and we both learnt a lot about various parts of traditional darkroom photography, the developing process, pin hole cameras, photograms and luminograms. Emma Hart, Sandy Secondary School, Bedfordshire

De Vere 504 enlarger in darkroom

DeVere 504 large format enlarger

Traditional black and white photographic prints still have some significant advantages over their digital equivalents the most obvious being its archival quality. A properly processed and washed black and white print on fibre based photographic paper should still be around in a hundred years time. The digital equivalent would need regular conversion by the photographer and their progeny to be available for future generations.

Darkroom options

My permanent darkroom is just outside of Bath, it houses two enlargers, a Devere 504 covering a range of film formats including; 35mm, 6cm x 6cm, 6cm x 7cm, and 5″x4″ and an LPL C7700 enlarger for 35mm up to 6cmx7cm.

I also have a mobile darkroom to provide onsite training which can accommodate the smaller enlarger.

Due to the compact size of the portable darkroom it is normally suited to teaching smaller groups.

Nova Darkroom Tent, outside (left) inside (right)

Darkroom consultancy service

If you are planning to set up a darkroom or revive a darkroom which hasn’t been used for a while, I can provide onsite support to test equipment and materials, provide the guidance and training to get you up and running. If you do not have a darkroom, I can bring along a small portable darkroom, all I need is a nearby sink and electricity.

Nigel sparked not only confidence in us, in what we were going to teach the students but also newfound enthusiasm for the process. Whilst with us Nigel also spent time checking out, advising, and helping organise and clean our current darkroom that hasn’t seen much love. He advised us on best practice and items to purchase to make what we had already easier to use and more effective, he even brought along his own kit as examples and to demonstrate techniques to us. Emma Hart, Sandy Secondary School, Bedfordshire

Typical workshop content might include;

  • an introduction to darkroom equipment,
  • film processing demonstration,
  • camera-less photography, photograms, cyanotypes, luminograms,
  • contact printing, enlargement, use of multigrade paper,
  • advanced darkroom technique, dodging and burning and split grade printing
  • experimental darkroom techniques.
Darkroom materials and equipment

Preparing a darkroom

Guidance on teaching darkroom techniques on GCSE, A level and BTEC course at schools and colleges

Having taught film and darkroom photography for some time, I recognise the common pitfalls encountered by new users and have developed a range of strategies to simplify learning. If you are introducing traditional analogue photography and darkroom techniques into your curriculum, I can help you to structure your sessions to support learning. Sessions also include a range of experimental darkroom techniques

Film photography

In addition to darkroom workshops, I can also provide training on using black and white film, choosing a camera, loading film, unloading film, processing options and film processing.

Hasselblad 500CM and Nikon FM

Film (analogue) photography

Pinhole photography and camera-less photography workshop

Learn how to create photographic images without the need for a camera. In this practical workshop, attendees will learn how to create photographic images without the need for a camera. They will also learn about the camera obscura before making their own pinhole cameras and using them to take a range of different pictures.  This workshop can also include preparation and simple contact printing using the cyanotype process. At the end of the session, they will be able to take their cameras home to take extreme pinhole exposures over several months in length.

Pinhole image Cheney Court

6 month pinhole Cheney Court near Bath

Prices

Prices start at £380 for a day for up to 5 attendees (2 if using the portable darkroom)

If you would like me to deliver an analogue photography workshop at your school, home or workplace give me a call or drop me an email.

Man wearing black apron in photographic darkroom with Deere 504 enlarger in background


LinkedIn
Instagram